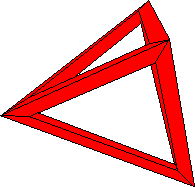
Five Intersecting Tetrahedra
About the object
 This visually stunning object should be a familiar sight to those who
frequent the landscapes of M.C. Escher or like to thumb through geometry
textbooks. To construct an origami version it is essential to have a good
understanding of the object's structure, which the accompanying pictures
try to illustrate.
This visually stunning object should be a familiar sight to those who
frequent the landscapes of M.C. Escher or like to thumb through geometry
textbooks. To construct an origami version it is essential to have a good
understanding of the object's structure, which the accompanying pictures
try to illustrate.
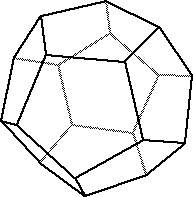
To the right is shown a dodecahedron - the classic polyhedra with 12
equal sides. If we were to take 4 equidistant corners of the
dodecahedron and connect them with lines, the result would be a pyramid
(a tetrahedron) inscribed in the dodecahedron. This is illustrated below.
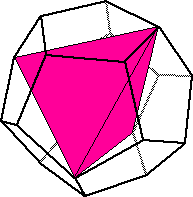
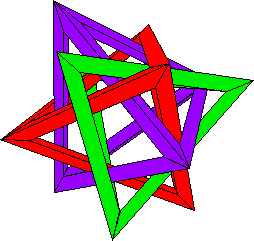
This tetrahedron has 4 corners, and the dodecahedron has 20 corners
total. Thus we could inscribe 5 distinct tetrahedra inside a dodecahedron! The
result of doing this is shown below.
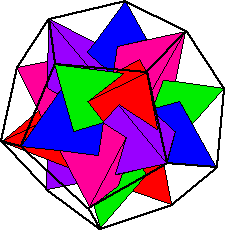
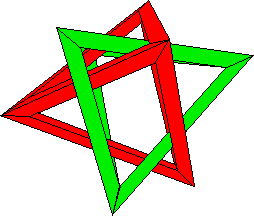
 Thus the left hand picture illustrates what five intersecting tetrahedra
look like, and notice how all these pyramids are cutting into each other.
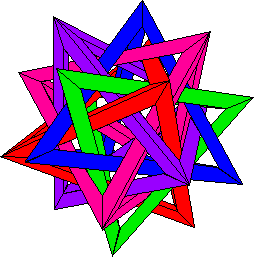
Suppose we replaced these pyramids with tetrahedral frames. Provided we
made the frames thin enough, they wouldn't cut into each other anymore,
and the result (shown to the right) would be an intricate woven nest of 5
tetrahedra. This is what we shall construct via modular origami!
Thus the left hand picture illustrates what five intersecting tetrahedra
look like, and notice how all these pyramids are cutting into each other.
Suppose we replaced these pyramids with tetrahedral frames. Provided we
made the frames thin enough, they wouldn't cut into each other anymore,
and the result (shown to the right) would be an intricate woven nest of 5
tetrahedra. This is what we shall construct via modular origami!
So here is the task: Given this wildly complex-looking structure, how do
we make it out of modular origami units? Well, if we could make a modular
tetrahedral frame we'd be 90% there, right? I mean, in theory at least,
if we could make a tetrahedral frame of sufficient thinness then all we'd
have to do is make 5 of them and figure out how to weave them together.
Yes, that last part (the "weaving") is the hardest step, but before we
can even think about that we need to find a tetrahedral frame unit.
And what do ya know? A good perusal of the origami literature reveals a
perfect unit for our task! In the December 1986 issue of the British
Origami Society Magazine (No. 121, p. 32) we see Francis Ow's "60 degree
Unit". This unit is made from a 1x2 piece of paper and produces a frame
that's too thick for our purposes. That is, the width of the frame is too
thick to allow 5 tetrahedra to be woven together as per the previous
page. But if we instead fold Francis Ow's unit from a 1x3 piece of paper
we'll be in buisness!
Francis Ow's 60 degree Unit
Making one tetrahedron frame requires six 1x3 pieces of paper. In
other words, it will take two squares which then must be cut into 1x3
strips. To make the full 5 intersecting tetrahedra model you'll need to
make 5 of these tetrahedra - that's a total of 10 squares of paper. To
make each tetrahedron a different color, as in the picture above,
you'll thus need 5 different colors and 2 square sheets per
color.
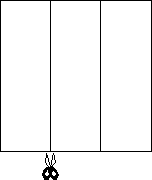
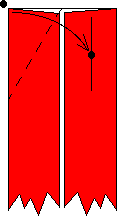
 Take one of the 1x3 strips (white side up) and crease it down the middle.
Then fold the sides to the center line. The right-most picture shows a
close-up of the top end. Fold the right flap to the side, only
making a pinch! This crease will be needed for the next step.
Take one of the 1x3 strips (white side up) and crease it down the middle.
Then fold the sides to the center line. The right-most picture shows a
close-up of the top end. Fold the right flap to the side, only
making a pinch! This crease will be needed for the next step.
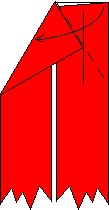
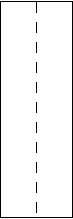
 Then fold the upper-left corner to this crease line, making sure
that the crease hits the midpoint of the top edge, as shown in the
left-most picture. (Note that this is axiom (O5) in Huzita's axiom list
(see Origami Geometric Constructions), and
creates a 60 degree angle for us!) Then fold the upper-right corner over
this flap, and unfold these flaps.
Then fold the upper-left corner to this crease line, making sure
that the crease hits the midpoint of the top edge, as shown in the
left-most picture. (Note that this is axiom (O5) in Huzita's axiom list
(see Origami Geometric Constructions), and
creates a 60 degree angle for us!) Then fold the upper-right corner over
this flap, and unfold these flaps.
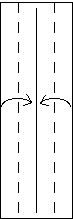
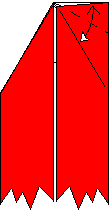 Now reverse fold the upper-left corner, using the crease that we
just made. The reversed flap should go inside the model. Then
(right-hand picture) fold and unfold the top edge of the right side to
the existing crease line.
Now reverse fold the upper-left corner, using the crease that we
just made. The reversed flap should go inside the model. Then
(right-hand picture) fold and unfold the top edge of the right side to
the existing crease line.
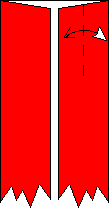
 OK! We're done with one end, so rotate the model 180 degrees and repeat
this process on the other end. (Note that the unit will have a
left-handedness, like the Sonobe unit, and all of your units must have
the same handedness in order to fit together properly.) Lastly, crease
the unit down the middle, and you're done! You'll need 5 more to make
one tetrahedron.
OK! We're done with one end, so rotate the model 180 degrees and repeat
this process on the other end. (Note that the unit will have a
left-handedness, like the Sonobe unit, and all of your units must have
the same handedness in order to fit together properly.) Lastly, crease
the unit down the middle, and you're done! You'll need 5 more to make
one tetrahedron.
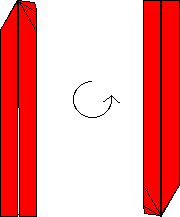
How to interlock the units
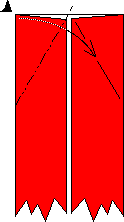
 The end of each unit has a flap on one side and a pocket on the other.
Insert the flap of one unit into the pocket of another as shown on the
left.
To the right is the result. Notice the nifty x-ray view effect, allowing
you to see exactly how the flap needs to hook around the crease.
This makes a strong lock.
The end of each unit has a flap on one side and a pocket on the other.
Insert the flap of one unit into the pocket of another as shown on the
left.
To the right is the result. Notice the nifty x-ray view effect, allowing
you to see exactly how the flap needs to hook around the crease.
This makes a strong lock.
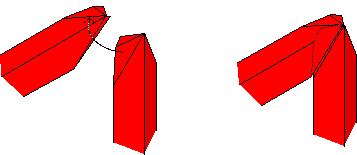
 Now get ready to insert the third unit! This should complete one "joint"
of the tetrahedron frame. Notice that each unit should form a "wedge"
(in cross-section). However, when insertig the last one you might want to
round-out the edges, so as to allow the last flap to hook around the
other unit. Then pinch the sides to make everything stay in place.
Now get ready to insert the third unit! This should complete one "joint"
of the tetrahedron frame. Notice that each unit should form a "wedge"
(in cross-section). However, when insertig the last one you might want to
round-out the edges, so as to allow the last flap to hook around the
other unit. Then pinch the sides to make everything stay in place.
To build on this tripod you've just made, add two units to one of
the tripod's legs to make another "joint". Then the last unit can be
added to complete the tetrahedron.
Forming the object
Unfortunately there's no easy way to describe how the tetrahedral frames
need to weave around each other to create the 5 intersecting tetrahedra
model. It really is a challenging puzzle to put it all together! I
suggest that you use the following series of pictures to guide you in
weaving one tetrahedron at a time.
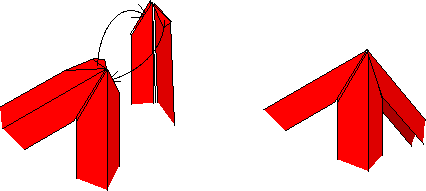
 Notice how, in the right-hand picture, the left-most corner of the red
tetrahedron is poking through a "hole" of the green one, and vice-versa,
the right-most corner of the green tetrahedron is poking throught a
"hole" of the red one. Further, this is done symmetrically. This
observation is key to understanding how the tetrahedra fit
together. Inspect the next pictures very carefully!
Notice how, in the right-hand picture, the left-most corner of the red
tetrahedron is poking through a "hole" of the green one, and vice-versa,
the right-most corner of the green tetrahedron is poking throught a
"hole" of the red one. Further, this is done symmetrically. This
observation is key to understanding how the tetrahedra fit
together. Inspect the next pictures very carefully!
There is a very strong symmetry behind the formation of this structure,
and understanding this symmetry can aid you in the construction. The
finished object should have the following property: any two tetrahedra
are interwoven with one corner poking through a hole of the other and
vice versa, kind of like a 3-D Star of David but slightly twisted. (This
is what we tried to describe above.)
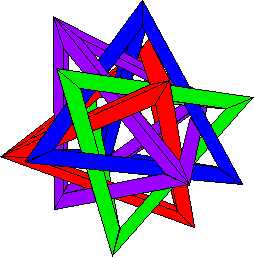
The important part, though, is that every pair of tetrahedral
frames in the finished model should have this property. I admit that this
is a hard concept to grasp, but it can help in checking to see if you're
"weaving" the frames properly.
Again, completing this model is a challenging puzzle, and the difficulty
of this challenge is reflected in the fact that the finished model is
nothing less than stunning. People's first reaction, when being shown the
object, is usually to stop and stare at it for a few hours in
fascination. Try it!
Exercises:
(1) Francis Ow uses his "60 degree Unit" to make frames of other
polyhedra as well. What other Platonic Solids can be made from this unit?
(2) Think about this "woven 5 tetrahedral frames" object for a moment. If
the frames are too thick, the model is impossible to make. But if the
frames are too thin, the tetrahedra will fall loose around each other and
look like a mess! Between these extremes there's a certain frame width
that is perfect, that is, will make the units fit snuggly together. When
made from 1x3 pieces of paper, Francis Ow's unit makes frames that are
1/12th as thick as the edge of the tetrahedron. Is this the "perfect"
width? Or is it just "close enough"?
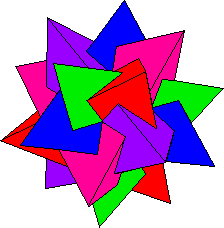 (3) Think about the "5 intersecting tetrahedra" object that we looked at
before turning the tetrahedra into tetrahedral frames (shown again on the
right). Wouldn't it be cool to create a modular origami unit that
produces this object? Try it!
(3) Think about the "5 intersecting tetrahedra" object that we looked at
before turning the tetrahedra into tetrahedral frames (shown again on the
right). Wouldn't it be cool to create a modular origami unit that
produces this object? Try it!
These pages Copyright 1997 Thomas Hull
Back to Origami Mathematics page